Campfire Chili in a Dutch Oven: The Ultimate Spring Recipe Guide

Campfire Chili in a Dutch Oven: The Ultimate Spring Recipe Guide
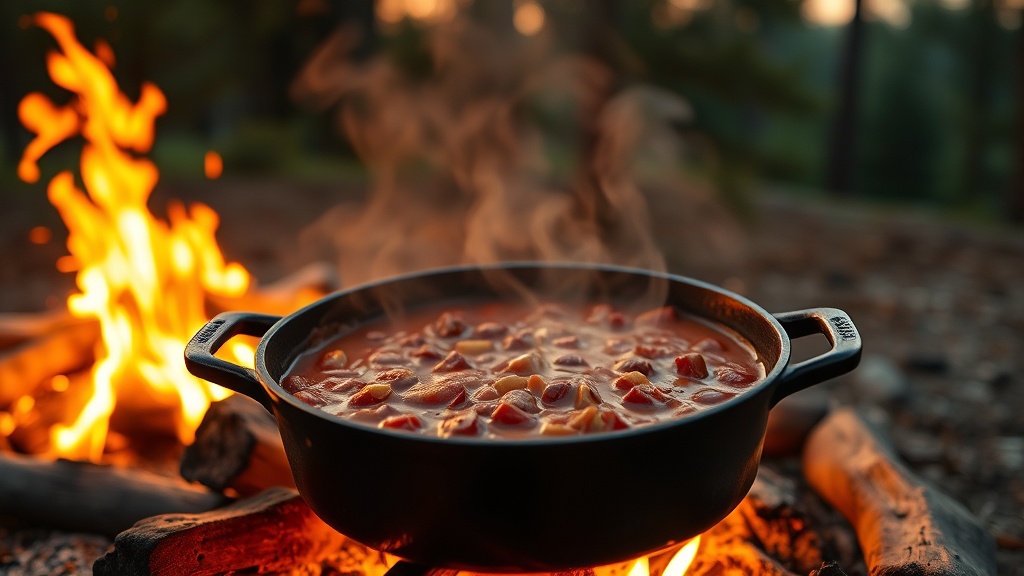
Hook: Imagine the smell of simmering tomatoes, smoky beef, and fresh pine filling the night air as you settle into a spring road‑trip stop. That’s the magic of a campfire chili cooked in a cast‑iron Dutch oven – a one‑pot wonder that feeds a hungry crew and fuels stories around the fire.
Context: With the road opening up for spring adventures, campers are hunting quick, hearty meals that require minimal gear. A Dutch oven chili hits that sweet spot: it’s portable, forgiving, and packs a punch of flavor that only a real fire can give.
What equipment do I need to cook chili over a campfire?
Before you even think about chopping onions, make sure you have the right tools. A standard 10‑inch cast‑iron Dutch oven (about 5‑6 qt) is ideal – it holds enough volume for a family‑size batch and distributes heat evenly. You’ll also need:
- Heavy‑duty fire‑proof gloves
- A sturdy tripod or grill grate (the tripod lets you raise the oven for gentle simmering)
- Long‑handled wooden spoon or spatula
- A reliable fire starter (our flint‑steel striker works great for wood fires)
Pro tip: If you’re traveling light, a portable propane fire pit can double as a heat source for the Dutch oven when wood isn’t available.
Which ingredients give the best flavor for a campfire chili?
Chili is a forgiving canvas, but a few core ingredients make the difference between “just okay” and “legendary.” Here’s my go‑to lineup (serves 6‑8):
- Meat: 2 lb beef chuck or short rib, cut into ½‑inch cubes. The marbling adds richness that wood smoke can’t replicate alone. USDA lists chuck at ~250 cal per 100 g, perfect for a satisfying meal.
- Sausage: ½ lb smoked pork sausage, sliced. The smokiness pairs beautifully with the fire.
- Veggies: 1 large onion (diced), 2 bell peppers (any color, diced), 2 carrots (grated for sweetness).
- Tomatoes: 2 cans (14 oz) diced tomatoes plus 1 cup tomato sauce.
- Spices: 2 tbsp chili powder, 1 tsp cumin, ½ tsp smoked paprika, ¼ tsp cayenne (adjust for heat).
- Beans: 1 can (15 oz) kidney beans, drained and rinsed. (Optional – you can skip beans for a “Texas‑style” chili.)
- Liquid: 1 cup beef broth (or water if you’re low on supplies).
All ingredients are pantry‑friendly, and you can swap in local produce you find at a roadside market for a fresh twist.
How do I cook the chili step‑by‑step?
Follow these 7 steps for a foolproof result – each step is phrased as a question to match our SEO style.
1. How do I start the fire?
Build a medium‑hot fire using dry hardwood (oak or hickory works best). Let the flames die down to a steady bed of coals; you’ll need a consistent 350‑400 °F heat zone.
2. How do I brown the meat?
Place the Dutch oven directly on the coals. Add a splash of oil, then sear the beef cubes in batches until they develop a deep brown crust – about 4 minutes per side. Remove and set aside.
3. How do I sauté the aromatics?
Return the pot to the fire, add a bit more oil, then toss in the onion, peppers, and carrots. Stir until softened, about 5 minutes.
4. How do I combine the rest of the ingredients?
Stir the browned meat, sausage, tomatoes, sauce, beans, broth, and spices into the pot. Scrape the bottom to release any caramelized bits – they’re flavor gold.
5. How do I simmer the chili?
Raise the Dutch oven onto the tripod (or a higher grate) so the heat is gentle. Cover with the lid and let it simmer for 45‑60 minutes, stirring every 10 minutes. The fire should stay low; if the liquid evaporates too quickly, add a splash of water.
6. How do I finish and serve?
Taste and adjust salt or heat. Serve hot with cornbread (our maple‑apple crisp makes a sweet side) or crunchy tortilla chips.
7. How do I clean the Dutch oven after camp?
While still warm, wipe the interior with a paper towel, then rinse with hot water. Avoid soap – the seasoned cast iron will stay non‑stick for the next fire.
What variations can I try for different tastes?
Chili is a canvas. Here are three crowd‑pleasing twists:
- White Bean & Chicken Chili: Swap beef for shredded rotisserie chicken and use white beans, green chilies, and a dash of cream.
- Veggie‑Heavy Chili: Omit meat and double the beans, corn, and zucchini for a hearty vegetarian version.
- Beer‑Infused Chili: Replace half the broth with a cold‑brew amber ale for a subtle malt note.
How do I store leftovers safely after the trip?
Cool the chili to room temperature within two hours, then transfer to airtight containers. In the backcountry, a cooler with ice packs keeps it safe for up to 24 hours. For longer storage, freeze in zip‑top bags – they’ll thaw quickly over a fire the next day.
Takeaway
With a solid Dutch oven, a handful of pantry staples, and a low, steady fire, you can whip up a campfire chili that feeds the crew, fuels stories, and turns any spring road‑trip stop into a culinary highlight. Pack the ingredients, fire up the coals, and let the aroma guide you back to the campsite night after night.
Ready to try it? Grab your Dutch oven, fire up the campfire, and let the chili simmer. Share your results in the comments – I love hearing how you make it your own!